Category Archives: MeRC

Using DPUs to encrypt traffic per VM

Glossary Terms:
DOCA = Data Center-on-a-Chip Architecture
DPU = Data Processing Unit 
NIC = Network Interface Card
OVS = Open Virtual Switch (also known as Open vSwitch)
SF = Scalable Function
VF = Virtual Function
VM = Virtual Machine

Motivation

In part one of this series, we showed how to set up an NVIDIA BlueField-2 DPU with the aim of simply using it as a NIC  (https://rcblog.erc.monash.edu.au/blog/2022/02/how-do-i-use-a-dpu-as-nic/). Today we’re going to delve a bit deeper and offload network layer encryption to the DPUs so that VMs running on the Host can use more of their allocated resources while still communicating securely.

Background

Servers and processors are becoming faster and more powerful, but at the same time the requirement for greater network security is increasing and end-to-end network encryption is mandatory in some of the more sensitive data research workloads. As the data throughput on the CPU is pushed to the limits, processors start to steal compute cycles for the network to be encrypted away from computing tasks for research work. 

Our aim is to try to mitigate part of this issue by offloading the work of encryption and decryption of traffic from the processors on the hypervisor(host) to the DPU and enable our researchers to work more efficiently and securely. 

Set up

Below is a diagram of the setup we used while testing:

Figure: Diagram of the setup we are describing. Two hosts running one VM each, each host has a DPU installed in a PCI slot, the DPUs are connected directly to each other (back to back).

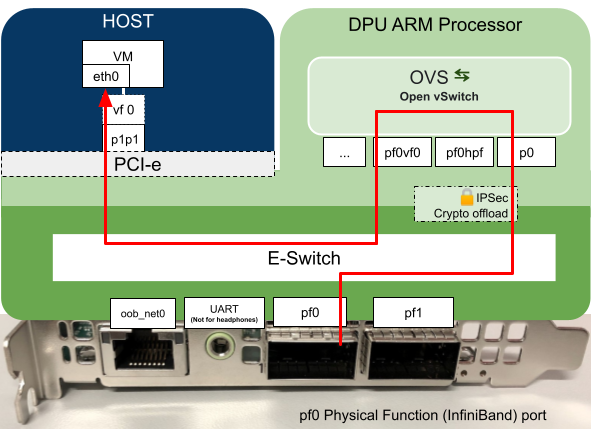
As we explained in our previous blog post, the DPU’s have programmable hardware for data processing, in this example the DPU has been programmed to process data coming in on port p0 which is then passed to the host which in turn is presented to the VM as the Virtual Function (vf0). The virtual function interface appears at the VM as eth1.

Setting up the DPU

Once the environment is set up as above we can move on to configure Open vSwitch and strongSwan encryption software on the DPU(yes that is the correct capitalization stylization)

To set up the OVS bridges and strongSwan (5.9.0bf) IPSec tunnel we used NVIDIA’s example from this website
https://docs.nvidia.com/doca/sdk/east-west-overlay-encryption/index.html

The change we needed to make was to add the interface pf0vf0 to the OVS Bridge vxlan-br0 on both DPUs to allow the VM’s to communicate with each other.

Example of OVS settings from one of the DPUs

ubuntu@localhost:~$ sudo ovs-vsctl show
352ec404-2519-4751-9a1b-3fd33780543c
    Bridge vxlan-br0
        Port pf0vf0
            Interface pf0vf0
        Port vxlan-br0
            Interface vxlan-br0
                type: internal
        Port vxlan11
            Interface vxlan11
                type: vxlan
                options: {dst_port=”4789″, key=”100″, local_ip=”192.168.50.1″, remote_ip=”192.168.50.2″}
        Port pf0hpf
            Interface pf0hpf
    ovs_version: “2.15.1-d246dab”

With the above OVS configuration, the logical flow of packets will be as below.

Here is a diagram of the “Path” defined by the above configuration:

Diagram of the logical setup:


Figure: Logical flow of packets through the DPU to the VM. 

Our current setup uses the Slow Path

The diagram was referenced on NVIDIA’s original from (https://docs.nvidia.com/doca/sdk/l4-ovs-firewall/index.html)


Setting IPSec Full Offload Using strongSwan

strongSwan configures IPSec HW full offload using a new value added to its configuration file.

By default two files are created in /etc/swanctl/conf.d when flashing the DPUs with DOCA SDK.

BFL.swanctl.conf and BFR.swanctl.conf

We only want one of these on each host. BFL on Host 16 and BFR on Host 17

We also want to make some changes to the .conf files.

On DPU 16

cd /etc/swanctl/conf.d/
mv BFR.swanctl.conf BFR.swanctl.conf.old
vi /etc/swanctl/conf.d/BFL.swanctl.conf 
#Note edit this file manually, copying the below output will probably result in issues
cat /etc/swanctl/conf.d/BFL.swanctl.conf 
# LEFT: strongswan BF-2 config file 
connections {
   BFL-BFR {
      local_addrs  = 3.3.3.2
      remote_addrs = 3.3.3.3

      local {
        auth = psk
        id = host2
      }
      remote {
        auth = psk
        id = host1
      }

      children {
         bf {
            local_ts = 3.3.3.2/24 [udp/4789]
            remote_ts = 3.3.3.3/24 [udp/4789]
            esp_proposals = aes128gcm128-x25519-esn
            mode = transport
            policies_fwd_out = yes
            hw_offload = full
         }
      }
      version = 2
      mobike = no
      reauth_time = 0
      proposals = aes128-sha256-x25519
   }
}

secrets {
   ike-BF {
      id-host1 = host1
      id-host2 = host2
      secret = 0sv+NkxY9LLZvwj4qCC2o/gGrWDF2d21jL
   }
}

On DPU 17

cd /etc/swanctl/conf.d/
mv BFL.swanctl.conf BFL.swanctl.conf.old
vi /etc/swanctl/conf.d/BFR.swanctl.conf 
#Note edit this file manually, copying the below output will probably result in issues
cat /etc/swanctl/conf.d/BFR.swanctl.conf
# RIGHT: strongswan BF-2 config file 
connections {
   BFL-BFR {
      local_addrs  = 3.3.3.3
      remote_addrs = 3.3.3.2

      local {
        auth = psk
        id = host1
      }
      remote {
        auth = psk
        id = host2
      }

      children {
         bf {
            local_ts = 3.3.3.3/24 [udp/4789]
            remote_ts = 3.3.3.2/24 [udp/4789]
            esp_proposals = aes128gcm128-x25519-esn
            mode = transport
            policies_fwd_out = yes
            hw_offload = full
         }
      }
      version = 2
      mobike = no
      reauth_time = 0
      proposals = aes128-sha256-x25519
   }
}

secrets {
   ike-BF {
      id-host1 = host1
      id-host2 = host2
      secret = 0sv+NkxY9LLZvwj4qCC2o/gGrWDF2d21jL
   }
}

Note: Make sure there is a new line at the end of these files or the config may not be applied correctly.

Commands to load strongSwan configuration

On Both DPUs
systemctl stop strongswan-starter.service
systemctl start strongswan-starter.service
swanctl –load-all

On left DPU (DPU 16)
swanctl -i –child bf

Commands to switch offloading on and off

#To enable offloading:
ovs-vsctl set Open_vSwitch . Other_config:hw-offload=true
systemctl restart openvswitch-switch

#To disable offloading:
ovs-vsctl –no-wait set Open_vSwitch . other_config:hw-offload=false
systemctl restart openvswitch-switch
#Check current offloading state
ovs-vsctl get Open_vSwitch . other_config:hw-offload

Experiments and results

We can now transmit data between the VMs which will automatically be encrypted by the DPUs as the information goes over the wire. We use iperf3 to generate network traffic between the VM’s while switching on and off hardware offloading capability on the DPU.

We start with hw-offloading disabled to observe the following results

Offload Disabled

#To disable offloading:
ovs-vsctl –no-wait set Open_vSwitch . other_config:hw-offload=false
systemctl restart openvswitch-switch

With offloading turned off via OVS on the DPU, we can see a ksoftirqd process with high cpu utilisation in the DPU.

Next we turn on hw-offloading and observed the change in behaviour

Offload Enabled

#To enable offloading:
ovs-vsctl set Open_vSwitch . Other_config:hw-offload=true
systemctl restart openvswitch-switch

With hw-offload enabled we no longer see the ksoftirqd having high CPU utilisation on the DPU

And the rate of data transfer increased more than 10 times than what we were seeing with hw-offload disabled.

We can also view the offloaded flows on the DPU when hw-offload is enabled:

ovs-appctl dpctl/dump-flows type=offloaded

#Example output
root@localhost:/home/ubuntu# ovs-appctl dpctl/dump-flows type=offloaded
recirc_id(0),in_port(4),eth(src=7a:9a:41:5d:11:81,dst=1e:e1:b3:b7:cb:db),eth_type(0x0800),ipv4(tos=0/0x3,frag=no), packets:3987309, bytes:6229832925, used:0.710s, actions:set(tunnel(tun_id=0x64,src=192.168.50.2,dst=192.168.50.1,ttl=64,tp_dst=4789,flags(key))),3
tunnel(tun_id=0x64,src=192.168.50.1,dst=192.168.50.2,tp_dst=4789,flags(+key)),recirc_id(0),in_port(3),eth(src=1e:e1:b3:b7:cb:db,dst=7a:9a:41:5d:11:81),eth_type(0x0800),ipv4(frag=no), packets:49131, bytes:5899556, used:0.710s, actions:4

Which proves that the offloaded flows were indeed executed on the DPU.
The above output shows the offloaded flows and their source IP address, destination IP address, source port, destination port, protocol and the number of packets and bytes in the flow.

Conclusion 

At this point we’ve set up two VMs and built an ipsec tunnel between them on the DPUs which automatically encrypts data sent over the wire. 

We’ve shown a noticeable speed difference between enabling and disabling  hw-offload and shown how to check the flows when they are being offloaded  and the impact on performance when they are not being offloaded. 

Future

As we provide IaaS (Infrastructure-as-a-Service) using OpenStack, the next step is to automate the setup of this configuration in the infrastructure using our CICD configuration management at DPUs so that the network traffic from the research workload VMs are encrypted underneath. We also consider having dedicated IPSec tunnels for the VMs from different projects running on the host so that underlay encrypted network fabric is separated for each project.

Written by Ben Boreham, Shahaan Ayyub, Swe Aung and Steve Quenette as part of a partnership between Nvidia, the Australian Research Data Commons (ARDC), and Monash University

ASPREE information systems for genomic medicine using targeted panel sequencing

Precision medicine and genomics hold great potential for improved detection of cancer, particularly the targeted DNA sequencing of genes that indicate the risk of developing cancer in the future. In 2015, solving this problem required a technologically complex task of combining advanced genomics analysis with extensive medical (phenotypic) health data. The research domain wasn’t there yet. It was still exploring, and here’s a part we played with Australia’s largest clinical trial.

Associate Professor Paul Lacaze is the head of the Public Health Genomics Program within the School of Public Health and Preventive Medicine, Monash University. Since 2015 this program has formed an integral part of the ASPREE study1 and ASPREE Healthy Ageing Biobank2. Their strategy was to partner with genomic sequencing facilities from across the globe, who each bought distinct expertise to the challenge of sequencing thousands of ASPREE participants for precision medicine applications. Each partnership has since been on a mission to integrate the study’s phenotypic and clinical outcome data with its novel techniques to understand the role of genetics in healthy ageing and diseases.

Hence our multiple global research collaborations needed an environment where they could discover how to join sensitive and big data such that insights could emerge. Solving such multi-disciplinary techno-social problems is the bread & butter of the digital cooperatives group within the Monash eResearch Centre (MeRC). We activated a hybrid of HPC-like and cloud resources appropriate for the active merging of sensitive clinical trial data with the targeted DNA sequencing data to solve this problem. The researchers explored a range of computational tools & techniques that were in themselves still an experiment. Learnings from engagements like this inform the processes and procedures we have today. Most pertinently, however, we took those communities and their respective organisations through the journey, and they now enjoy low barriers to generating impacts from these collaborations.

One of the research-led sequencing technologies or techniques is the “Targeted Sequencing” (Super Panel). The program collaborated with the Icahn School of Medicine at Mount Sinai to design a panel with around ~700 distinct genes that capture the following gene groups:  Cancer Genes, Cardiovascular Genes, PGX Genes, ACMG 56 Genes, Resilience Genes and Maturity Onset Diabetes of the Young (MODY) Genes.

From a logistical point of view, one of the advantages of target sequencing is the smaller storage footprint compared to whole-genome sequencing (which can be ten times bigger in terms of file size). The Mount Sinai group sequenced 13,000 ASPREE samples over several months. That generated ~30TB of sequence alignment files (BAMs) and variation files (VCFs). The first task (back then) was to establish a secure transfer channel for the data to Monash for both storage and downstream analysis. Immediately Paul identified that he did not have the tool or service readily available for this task. That’s when he engaged with MeRC. The Research Cloud at Monash (R@CMon) and digital cooperatives teams within MeRC provided the solution to address the project’s data transfer, storage, and computational requirements (see Figure 1 below). We have since co-operated this infrastructure with them.  

Figure 1. ASPREE Targeted Panel Ecosystem

In addition to collaborating with the Public Health Genomics Program and the program collaborating with clinical genomics leaders from across the globe, we collaborated with a software vendor. Together with BC Platforms, we designed a custom-build information system that meets the requirements of both clinical and genomics data processing. The digital cooperatives team provided hosting through the Research Cloud and Research Data Storage. We configured the analysis servers deployed on the Research Cloud with bioinformatics tools for processing the genomics data. Additionally, we deployed three core commercial products from BC Platforms: BC Genome – a secure online database (data warehousing system) for storing and dynamic analysis of genotype and phenotype data, BC Safebox – a secure remote desktop environment for controlled access and collaborative research management, and BC Predict – a web service for variant interpretation, curation and reporting, designed for clinical and medical researcher uses in pathogenicity. Figure 2 below shows an example of the variant curation interface in BC Predict.

Figure 2. Variant Curation in BC Predict

The digital cooperatives team deployed BC Platforms and the surrounding environment in a manner appropriate for sensitive genomics information. In collaboration with Monash University’s central IT (eSolutions), we contracted an external security penetration testing service to assess the deployment for handling sensitive information without losing the inherent scalability and configurability of the Monash Research Cloud. Figure 3 shows the high-level components of the ASPREE genomics information system.inherent scalability and configurability of the Monash Research Cloud. A high-level components diagram of the ASPREE genomics information system is shown in Figure 3.

Figure 3. ASPREE Genomics Information Systems Components

After four years of operations, the genomics system continues to establish close collaborations with national and international research communities. It has produced high impact research outcomes along the way3 4 5. The R@CMon team is excited about supporting the ASPREE Genomics team as it scales up its research endeavours.

This article can also be found, published created commons here 6.

How do I use a DPU as NIC?


Introduction

In this series we are exploring the Nvidia BlueField 2 DPUs (Data Processing Units). We predict that before too long, DPUs will be pervasive in the datacenter, where many users will be using DPUs without realising. This series is for data centre, cloud and HPC builders, who seek to understand and master DPUs for themselves. Most will use DPUs via software some other company has written (e.g. your favourite cybersecurity software). However, some will encode some business critical function (like encryption) onto DPUs, ensuring the users have no idea (no performance loss, no need to learn anything). Check out Steve’s GTC 2021 talk – “Securing Health Records for Innovative Use with Morpheus and DPUs” for a good introduction to DPUs for this series.

For the purposes of this series, our goal is to offload encryption from virtual machines running on each host onto the DPUs. This has two important benefits:

  1. Eliminates the need for VM users (researchers in our context) to add transport layer security themselves, creating a lower level of entry knowledge required for them to do their work breaking down the technical barrier.
  2. Achieves higher work / processing throughput as the security work is offloaded from the CPU itself.

A DPU is specialised programmable hardware for data processing outside of the CPU, but still on the server. The DPUs contain their own CPU, some accelerators (e.g. for encrypting), a NIC and can be programmed to behave differently depending on your needs.

A photo of one of our DPUs

In this blog we are looking at the most basic functionality: configuring DPUs as NICs for communication between two hosts. We’ve compiled some steps and a list of some of the things that caught us out. Each of these steps were run on both hosts unless otherwise noted.

By default the DPU should act like a NIC out of the box. However it may have already been used for something else. Sometimes the DPU will be loaded with the image you want… sometimes it won’t. Hence we will assume we will need a fresh start to work from.  If you are anything like us, you’re using a pair of Ubuntu 20.04.3 LTS installations running on Dell servers with a mix of brand new DPUs and older DPUs.

Glossary of terms:
DOCA = Data Center-on-a-Chip Architecture
DPU = Data Processing Unit 
NIC = Network Interface Card
OVS = Open Virtual Switch (also known as Open vSwitch)

What are we trying to achieve?

In the logical (OVS) diagram provided by Nvidia we see that inside the DPU, the physical port connects to the p0 interface which is forwarded to the pf0hp0, which then appears inside the host as the PF0 interface. In the diagram below we see two of the modes the DPU can run.

The “Fast Path” mode bypasses the DPU processors. Conversely the “Slow Path” will  use the DPU’s processors. Our understanding is that all new connections first occur through the Slow Path. Then if the DPU is configured to behave as a NIC, the E-Switch knows it can bypass the DPU processors themselves. The Slow Path is the stepping stone to doing much more interesting things.

Source: Nvidia (https://docs.nvidia.com/doca/sdk/l4-ovs-firewall/index.html)

See our practical implementation for the simple DPU as a NIC case below. We keep the eth0 interfaces of the host connected to a switch for management purposes. The p1p1 (PF0) interfaces of the Bluefield 2 DPU cards are connected directly to each other.

Diagram of how our machines are connected.

Installing drivers, flashing the device (and installing DOCA via the NVIDIA SDK manager)

Once the DPU is installed in a PCI slot in your host machine you’ll probably want to install drivers and connect to the DPU.

DPU usually comes with Ubuntu OS installed as default. In that case we just need to install a MOFED driver on the host to be able to use the DPU.

If you want to reimage the operating system of the DPU, you will need the NVIDIA DOCA SDK installed via the NVIDIA SDK manager.

Additional information about setting up the NVIDIA SDK manager on the host can be found at: https://developer.nvidia.com/networking/doca/getting-started

In our case this meant installing the latest version of DOCA for Ubuntu 20.04.

First we downloaded the sdkmanager_1.7.2-9007_amd64.deb package and transferred it to the host. To download this file you need to be logged in to Nvidia’s dev portal so it’s best to do this from a browser)

sudo dpkg -i sdkmanager_1.7.2-9007_amd64.deb
#If you get dependency errors run the following
sudo apt-get update && sudo apt-get upgrade
sudo apt-get -f install
sudo apt-get install libxss1
sudo apt-get install docker
sudo dpkg -i sdkmanager_1.7.2-9007_amd64.deb
#Then confirm that you have the latest version with
sudo apt install sdkmanager -y
#Then run the sdkmanager
sdkmanager 

On the first run you will need to log in to NVIDIA’s devzone services (the sdkmanager tool prompts you to log in to a website and enter a code / scan a QR code).
We opted to use X11 forwarding to log in via the GUI.

Further information about this process can be found at:

https://docs.nvidia.com/sdk-manager/download-run-sdkm/index.html#login

Once the NVIDIA SDK manager has been installed you can install the drivers and flash the DPU using the following command:

#Note if you have a previous version of DOCA installed you can uninstall it using this command
sdkmanager --cli uninstall --logintype devzone --product DOCA --version 1.1 --targetos Linux --host


#(Re)installing DOCA
sdkmanager --cli install --logintype devzone --product DOCA --version 1.1.1 --targetos Linux --host --target BLUEFIELD2_DPU_TARGETS --flash all

#Note: Default username on the DPU is: ubuntu

On the first run you will need to log in to NVIDIA’s devzone services (the sdkmanager tool prompts you to log in to a website and enter a code / scan a QR code). Further information about this process can be found at: https://docs.nvidia.com/doca/sdk/installation-guide/index.html

A successful NVIDIA DOCA SDK installation (note newer versions look different)

Once the DPU has been successfully flashed you will need to reboot the host to ensure the new interfaces (p1p1 and p1p2) are present.

Note: We renamed the interfaces to p1p1 and p1p2 so that it is easier to remember and use in configuration management

#On both Hosts
sudo reboot
#Once they reboot check that p1p1 and p1p2 are present in
ip a 

You should see something like this in: ip link show

6: p1p1: <BROADCAST,MULTICAST,UP,LOWER_UP> mtu 1500 qdisc mq state UP mode DEFAULT group default qlen 1000
    link/ether 0c:42:a1:e7:1e:b2 brd ff:ff:ff:ff:ff:ff
7: p1p2: <BROADCAST,MULTICAST,UP,LOWER_UP> mtu 1500 qdisc mq state UP mode DEFAULT group default qlen 1000
    link/ether 0c:42:a1:e7:1e:b3 brd ff:ff:ff:ff:ff:ff

There should also be management and rshim interfaces of the DPU present.

10: enp66s0f0v0: <BROADCAST,MULTICAST> mtu 1500 qdisc noop state DOWN mode DEFAULT group default qlen 1000
    link/ether ca:29:81:20:cb:51 brd ff:ff:ff:ff:ff:ff
13: tmfifo_net0: <BROADCAST,MULTICAST,UP,LOWER_UP> mtu 1500 qdisc fq_codel state UNKNOWN mode DEFAULT group default qlen 1000
    link/ether 00:1a:ca:ff:ff:02 brd ff:ff:ff:ff:ff:ff

You can verify the drivers and firmware that are installed by using the command: 

ethtool -i  p1p1

ubuntu@HOST-17:~$ ethtool -i p1p1
driver: mlx5_core
version: 5.5-1.0.3 ← Mellanox ofed driver version
firmware-version: 24.32.1010 (MT_0000000561) ← Firmware version of DPU
expansion-rom-version:
bus-info: 0000:42:00.0
supports-statistics: yes
supports-test: yes
supports-eeprom-access: no
supports-register-dump: no
supports-priv-flags: yes

Connecting to DPU 

Now that DOCA has been installed and the DPU has been flashed with the firmware, we can connect to the DPU. In our case here we configure an ip address at the rshim interface to access DPU.

 ip addr add 192.168.100.1/24 dev tmfifo_net0

9: tmfifo_net0: <BROADCAST,MULTICAST,UP,LOWER_UP> mtu 1500 qdisc fq_codel state UNKNOWN group default qlen 1000
    link/ether 00:1a:ca:ff:ff:02 brd ff:ff:ff:ff:ff:ff
    inet 192.168.100.1/24 scope global tmfifo_net0
       valid_lft forever preferred_lft forever
    inet6 fe80::21a:caff:feff:ff02/64 scope link
       valid_lft forever preferred_lft forever

We access DPU via ssh from the Host, but other methods of connecting are listed here: https://docs.mellanox.com/display/MFTV4120/Remote+Access+to+Mellanox+Devices 

#Connect to the DPU from the Host
ssh ubuntu@192.168.100.2

#To check the driver and firmware (on the DPU)
ethtool -i p0

#Query from flint (On the DPU)
sudo flint -d /dev/mst/mt41686_pciconf0 q

#Check default OVS configuration (On the DPU)
sudo ovs-vsctl show

The query from flint should look something like this on the DPU:

ubuntu@localhost:~$ sudoflint -d /dev/mst/mt41686_pciconf0 q
Image type: FS4
FW Version: 24.32.1010
FW Release Date: 1.12.2021
Product Version: 24.32.1010
Rom Info: type=UEFI Virtio net version=21.2.10 cpu=AMD64
type=UEFI Virtio blk version=22.2.10 cpu=AMD64
type=UEFI version=14.25.17 cpu=AMD64,AARCH64
type=PXE version=3.6.502 cpu=AMD64
Description: UID GuidsNumber
Base GUID: 0c42a10300e71eb2 12
Base MAC: 0c42a1e71eb2 12
Image VSD: N/A
Device VSD: N/A
PSID: MT_0000000561
Security Attributes: N/A

The default config of OVS should look something like this on the DPU:

ubuntu@localhost:~$ sudo  ovs-vsctl show
10c2d713-1ca3-4106-8eea-1178f3c1348d
    Bridge ovsbr1
        Port p0
            Interface p0
        Port pf0hpf
            Interface pf0hpf
        Port ovsbr1
            Interface ovsbr1
                type: internal
    Bridge ovsbr2
        Port p1
            Interface p1
        Port pf1hpf
            Interface pf1hpf
        Port ovsbr2
            Interface ovsbr2
                type: internal
    ovs_version: "2.14.1"

Thanks to the default OVS (Open Virtual Switch) configuration you can also add IP addresses to the p1p1 interfaces on the hosts to enable connection between them.

#On Host-16
sudo ip addr add 10.10.10.16/24 p1p1
sudo ip link set p1p1 up
#On Host-17
sudo ip addr add 10.10.10.17/24 p1p1
sudo ip link set p1p1 up
ping -I p1p1 10.10.10.16

Troubleshooting:

If your OVS configuration does not match the example or the ping test fails, you might want to try removing all existing OVS configurations using the “ovs-vsctl del-br“

For example if you had a bridge called “arm-ovs” you could delete it with the following command

sudo ovs-vsctl del-br arm-ovs

Then recreate the default OVS bridges ovsbr1 and ovsbr2 with the following commands:

ovs-vsctl add-br ovsbr1
ovs-vsctl add-port ovsbr1 pf0hpf
ovs-vsctl add-port ovsbr1 p0

# configure p1p2 (optional in our case, p1p2 is not used)
ovs-vsctl add-br ovsbr2
ovs-vsctl add-port ovsbr2 pf1hpf
ovs-vsctl add-port ovsbr2 p1

ip link set dev ovsbr1 up
ip link set dev ovsbr2 up

Important note: Adding p0 and p1 of DPU to the same ovs bridge could cause a loop and potentially create a multicast issue in the network.

Some observations, noting we’re dealing with very new technology:

  1. Installing DOCA sdk via the command line is not yet simple.
  2. Sometimes DOCA install  may fail and trying it again usually works. (Note: The newest version “1.2.0” does not seem to have this issue)
  3. To be able to use both ports of the DPU, we observe they need to be configured with IP addresses of the different vlan on the host.

Conclusion

Once the DPUs have been installed and flashed correctly you can easily add IP addresses to the p1p1 interfaces on the hosts to enable network configuration. In the next post we’ll look at the NVIDIA DOCA East-West Overlay Encryption Reference Application.

Written by Ben Boreham, Swe Aung and Steve Quenette as part of a partnership between Nvidia, the Australian Research Data Commons (ARDC), and Monash University

2nd place in the SC21 Indy Student Cluster Competition

Six Monash University students have taken 2nd prize in the SuperComputing 2021 Indy Student Cluster Competition (IndySCC).

The IndySCC is a 48 hour contest where students run a range of benchmarking software (this year – HPL and HPCG), well established scientific applications (Gromacs, John The Ripper) and a mystery program (Devito), whilst also keeping power consumption to under 1.1KW. That’s right – even the most advanced digital research infrastructure has meaningful Net Zero aspirations!

The six students – the Student Cluster Team – are part of an undergraduate team called Deep Neuron. Deep Neuron itself is part of a larger group of Engineering Teams that offer a range of extra-curricular activities. DeepNeuron is focused on improving the world through the combination of Artificial Intelligence (AI) and High-Performance Computing (HPC).

“The experience of participating in such a well known competition and the opportunity to collaborate with different students and experts allowed us to learn valuable skills outside of our classroom. We feel privileged and would like to thank all the support from DeepNeuron, supervisors and the faculty”

Yusuke Miyashita, HPC Lead, Deep Neuron

This achievement is even more impressive given that the students have never physically met each other due to covid restrictions. Earlier this year, the students also entered the Asia Supercomputing Community 2021 virtual Student Cluster Competition (ASC21 SCC), where they won the Application Innovation Award (shared with Tsinghua University) for the fastest time for the Mystery Application. That team was led by Emily Trau, who also works as a casual at MeRC.

“Despite the COVID lockdown, the students from Monash University’s Deep Neuron have hit well above their weight, winning significant prizes in two prestigious International Student Cluster Competitions. Well done to all involved”

Simon Michnowicz, Monash HPC team

All teams in the competition were tasked with configuring a resource made available to them on the Chameleon Cloud for each benchmark. Chameleon is similar to the Nectar Research Cloud, in that it provides Infrastructure as a Service to researchers. However Chameleon focus is experiments in edge, cloud and HPC (experiments on the infrastructure itself). The Research Cloud focus is being a resource for, and the instigator of collaboration for all research disciplines. Where Chameleon and the Research Cloud and Monash are particularly similar is being the test bed for new hardware and software technologies pertinent to digital research infrastructure. For example, MASSIVE and Monash’s own MonARCH HPC are built on the Research Cloud.

It is formally the end of the competition. What a journey! You all did an excellent job and we are impressed by how smart, hard-working and dedicated all the teams were. You all deserve a round of applause”

IndySCC21 Chairs Aroua Gharbi and Darshan Sarojini

JohntheRipper cracking passwords

GROMACS simulation of a model membrane

Monash University Joins OpenInfra Foundation as Associate Member

In research, building on the shoulders of others has long meant referencing the contributions of past papers. However, increasingly research-led data & (and the focus here…) tools are more impactful contributions. 

To this end, and after nearly a decade in the making, the eResearch Centre has joined the Open Infrastructure Foundation as an associate member. See the announcement here.

Universities are living laboratories for research-driven infrastructure. They require perpetual & bespoke computing at scale, which when combined, are the killer app for #opensource infrastructure, the associated communities and their practices. 

“Monash University has long believed in the power of using open source solutions to provide infrastructure for research, so it is with great pleasure that we formalize our long relationship and welcome them as a new associate member.”

Thierry Carrez, vice president of engineering at the OpenInfra Foundation, partnership announcement

Over the last decade open data and open source software have established legal entities (foundations) to ensure priorities, quality and sustainability of the data/tool are managed at commercial / real-world levels. Our partnership Open Infrastructure Foundation helps our researchers access tools for their own digital instruments that are in-turn produced, curated and maintained at the rate of global cloud development (across all industries). In this regard we’re amongst a pioneering set of institutions including CERN, Boston University and others. We give back by ensuring our research workloads are driving the community and infrastructure, pushing new technologies and expectations through the ecosystem.

“Open source and in particular the OpenInfra ecosystem is the language by which we craft HPC, highly sensitive, cloud and research data instruments at scale in a way that is closer to research needs, and with access mechanisms that is closer to research practice. We look forward to continued sharing of learnings with the community and pioneering of digital research infrastructure.”

Steve Quenette, Deputy Director of the Monash eResearch Centre, partnership announcement

To provide some indication of impact – 0.5 billion users (including our ~1000 research CIs) using 1.8m servers / 8.4m virtual machines and 4.5m public IP addresses benefit every contribution made by the global community. (From 2020 survey, which is certainly under-reported)

This article can also be found, published created commons here 1